Build Kitchen Cabinet Boxes for Corner Sink
Difficulty
Intermediate
| 
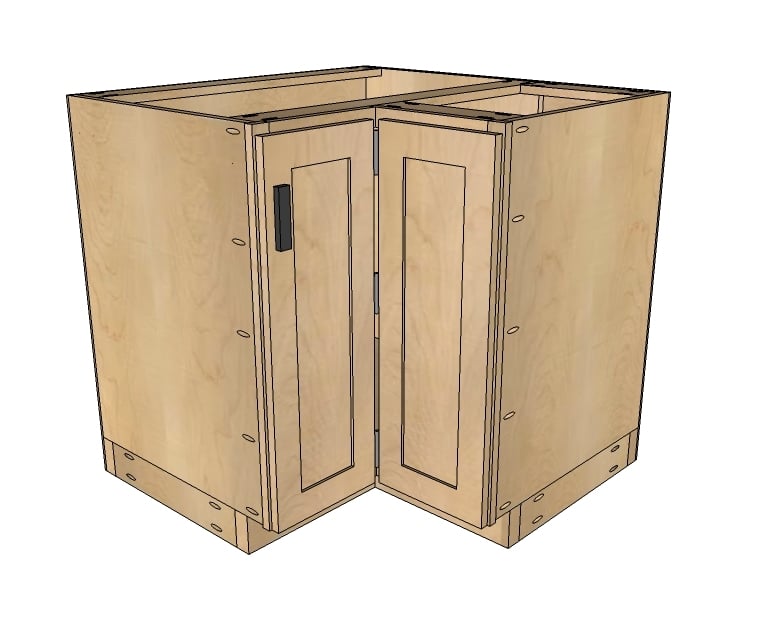
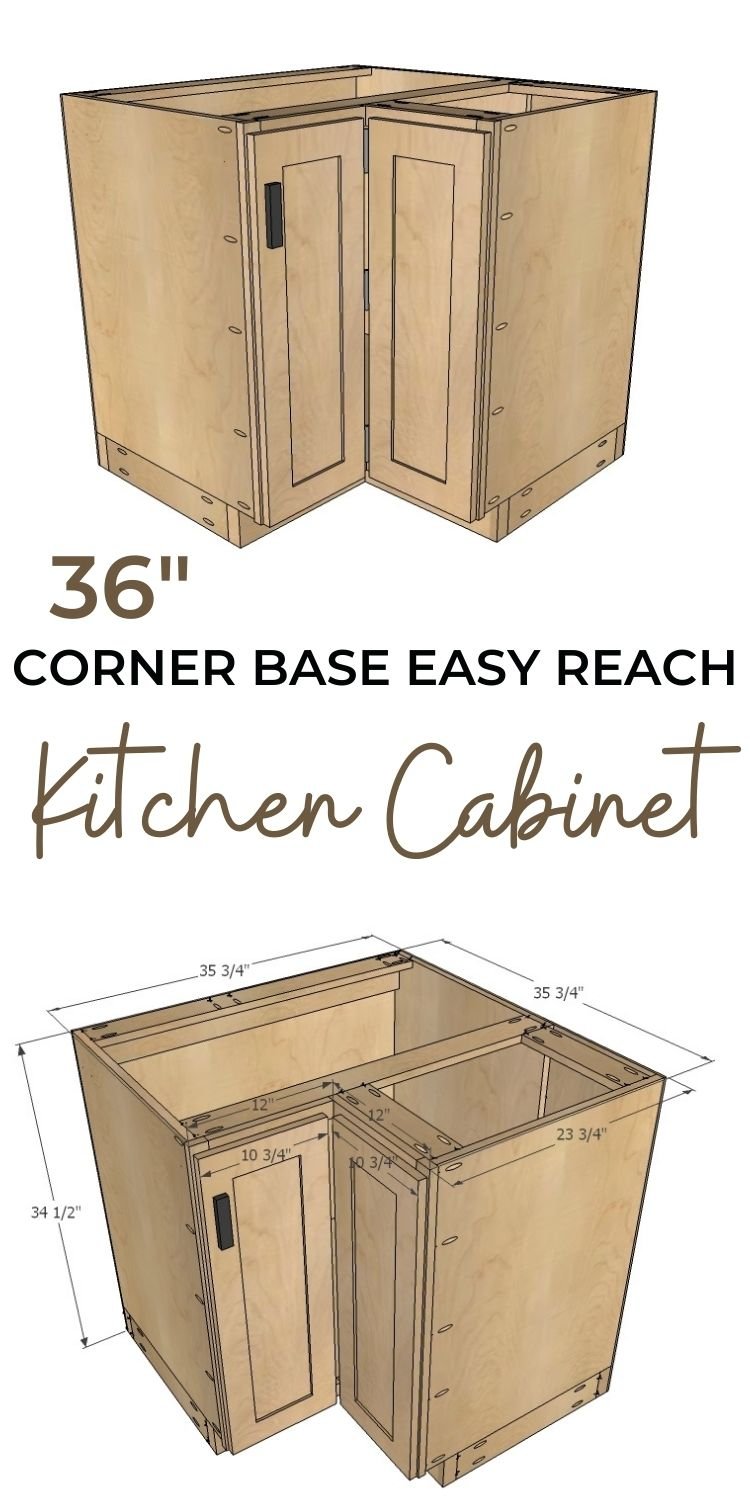
How to build a Easy Reach Corner Base Cabinet for kitchen cabinets. This plan is simple and economical to build. Free step by step plans including cut list, shopping list and detailed diagrams and instructions.
Good luck building! We've got tons more plans to add to the collection, if there's something you'd like to see a plan for, make sure you holler!
With all the kitchen plans - and most all of my plans for the matter - I like to have the main box boards ripped down to a standard size board, and go from there. Be it a 1x12 or 1x16 or 1x24 - yes, that's not really a board size - by using standard width boards in plans, you can:
- Maximize materials use. There are no odd looking scraps with circular saw cuts and possibly square edges laying in your scrap pile. Instead, you are left with standard width boards that you can build more cabinets or furniture with. Bonus: a standard practice is to rip plywood into 12, 16 or 24 widths for the least amount of waste.
- Simplify cutting. Anyone that's every cut random sized rectangles out of plywood knows this is easier said than done. If you can't cut all the way through with a circular saw or tablesaw, you have to cut beyond the cut or finish the cut with a jigsaw or handsaw. And then you are working with a piece of plywood with a piece cut out of it. By ripping into widths to start out, all you have to do when you build is make straight cross cuts.
- Better cuts. By making full length rips and cross cuts, you are always making long straight cuts which tend to be more accurate than following along a chalk line. And a good cut is very important in making square cabinets - especially when they all line up in a row!
- Easier to handle/transport. Well, I'll admit it. Picking up a sheet of 3/4" plywood is heavy. And trying to fit it in my car is impossible. Having the nice guy - or gal - at the hardware store rip it into 16" widths first just makes everything easier.
So this corner cabinet has been keeping me up at night, nagging at me to create a design from 1x24s as we call them (they are really 3/4" thick x 22 3/4" wide). Sure, cutting out 3 foot by 3 foot shapes for the bottom and shelves, and then more for the sides and backs would make a very strong cabinet. But it will use a ton of plywood up and create quite a few challenges. It's absolutely a great way to go if you've got the tools and budget and I'll be posting more complicated corner cabinet plans shortly.
But I wanted to post first a more economical option that can be made from just one sheet of 3/4" plywood or MDF or - this is painful to write - particle board (plus your 1x2 frame and the 1/4" back and doors and 2x4 base). Something easy to build, that uses the same 22 3/4" wide boards we use for all the base kitchen cabinet plans.
Like all kitchen cabinet plans, I'm uploading to Google 3D Warehouse so you can download the models and design your own kitchen. Golly, I love that program!
Pin for Later!
Dimensions
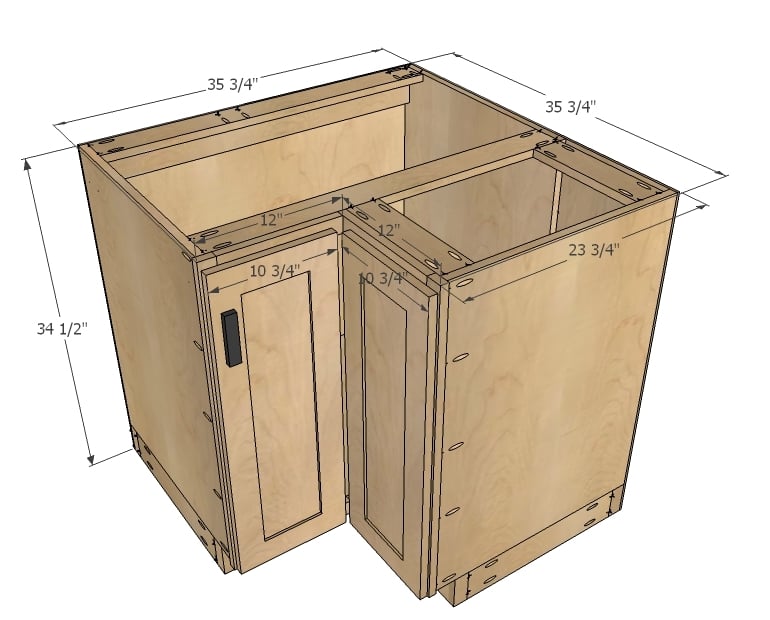
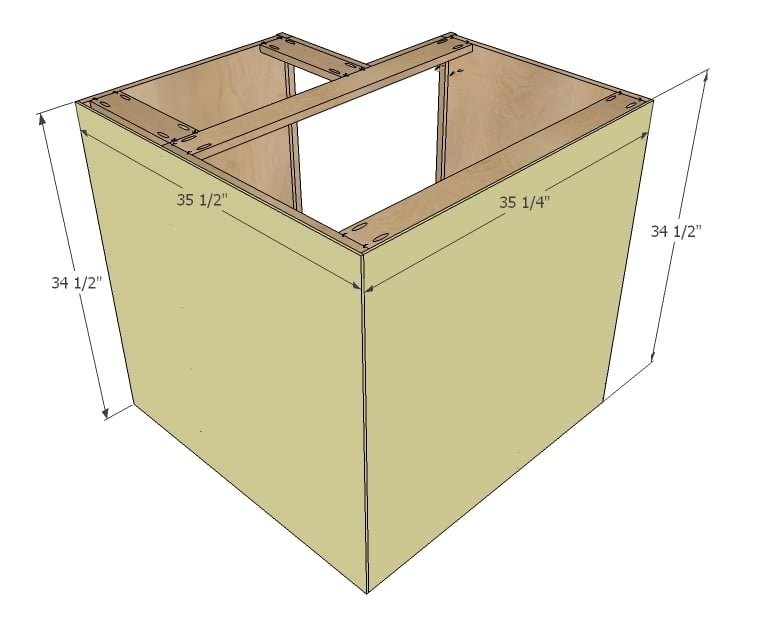
The corner cabinet is designed for standard 36" x 36" corner with 34 1/2" height and works with existing cabinet plans with full overlay/face frames.
Preparation
Shopping List
1 - sheet 3/4" plywood ripped into 22 3/4" widths, 8 feet long (we'll be calling these 1x24s in this plan) PS - Save the scrap in the center! 1 - 1x2 @ 8 feet long 1 - 1x4 @ 8 feet long (for the supports) 2 - 2x4 @ 8 feet long 1 - sheet 1/4" plywood
Common Materials
1 1/4 inch finish nails
120 grit sandpaper
Cut List
Box 3 - 1x24 @ 31" 1 - 1x24 @ 33 3/4" (make another for shelves) 1 - 1x24 @ 11 3/4" 2 - 1x4 (or scrap plywood) @ 33 3/4" 2 - 1x4 (or scrap plywood) @ 11 3/4" 2 - 1/4" plywood @ 35 1/4" x 34 1/2" Face Frame 2 - 1x2 @ 31" 2 - 1x2 @ 10 1/2" 2 - 1x2 @ 11 1/4" Base 2 - 2x4 @ 35 1/4" 4 - 2x4 @ 17 1/2" 2 - 2x4 @ 14 3/4" Doors 2 - 3/4" thick x 10 3/4" x 30 1/4"

General Instructions
Please read through the entire plan and all comments before beginning this project. It is also advisable to review the Getting Started Section. Take all necessary precautions to build safely and smartly. Work on a clean level surface, free of imperfections or debris. Always use straight boards. Check for square after each step. Always predrill holes before attaching with screws. Use glue with finish nails for a stronger hold. Wipe excess glue off bare wood for stained projects, as dried glue will not take stain. Be safe, have fun, and ask for help if you need it. Good luck!
Instructions
Step 1
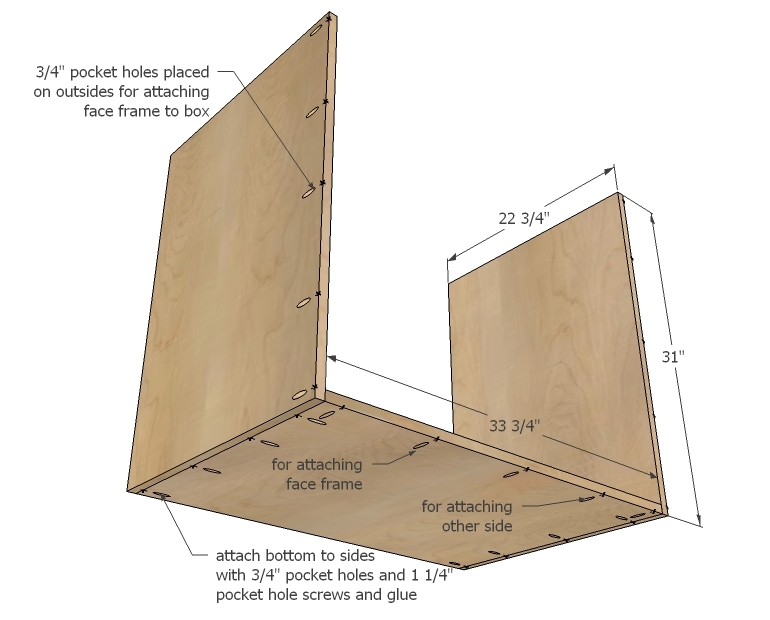
The main thing to remember in this plan is to drill all your pocket holes first. And if you are attaching face frames with pocket holes, drill them before assembly. One of our very bright readers suggested drilling pocket holes for face frame attachments on the outsides because they will be covered up anyway and the inside will be completely finished. Great stuff!
Attach bottom to sides with glue and 1 1/4" pocket hole screws.
Step 2
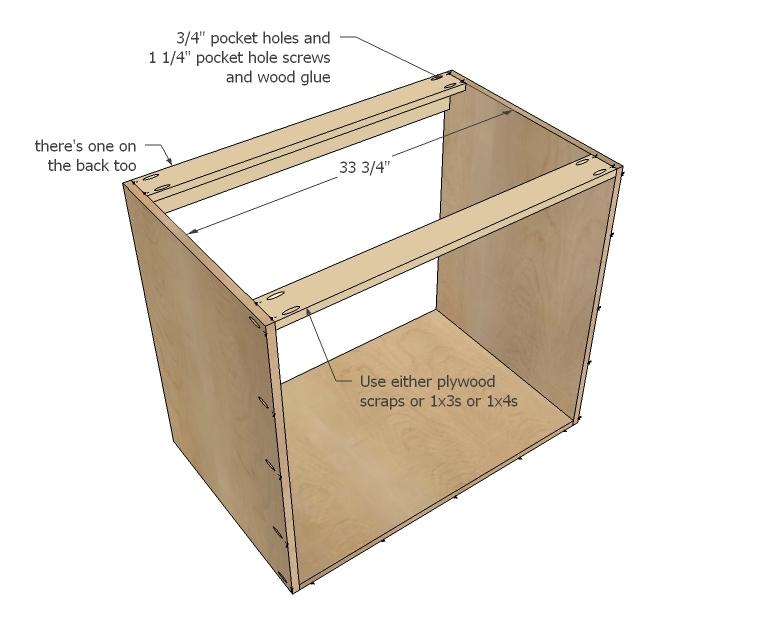
Once you get the main box built, it's time to add some supports. These could be the 1x4s or the scrap strip of plywood leftover from ripping into 1x24 strips.
Step 3
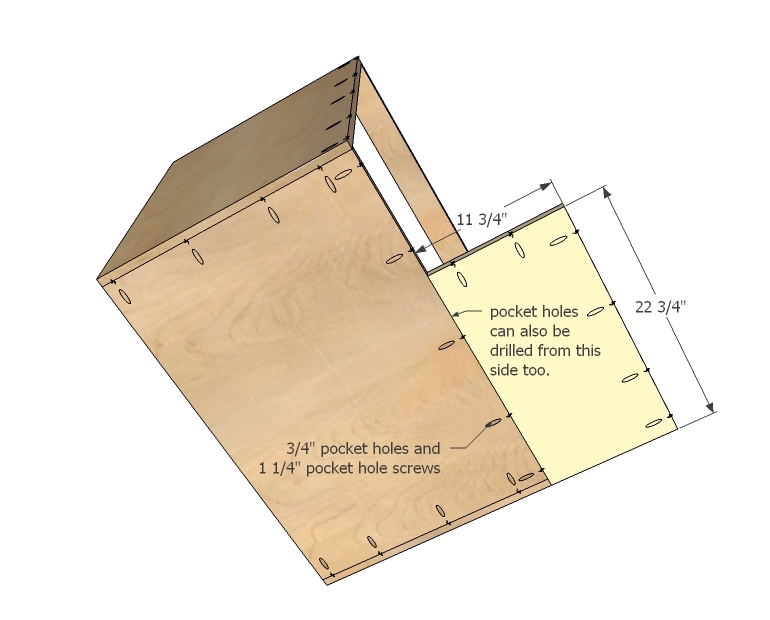
Now it's time to add the bottom for the adjoining side. You will need to use 1 1/4" pocket hole screws and 3/4" pocket holes to attach.
Make sure you predrill pocket holes for attaching face frame and side.
This seam will be fully supported by the base in later steps.
Step 4
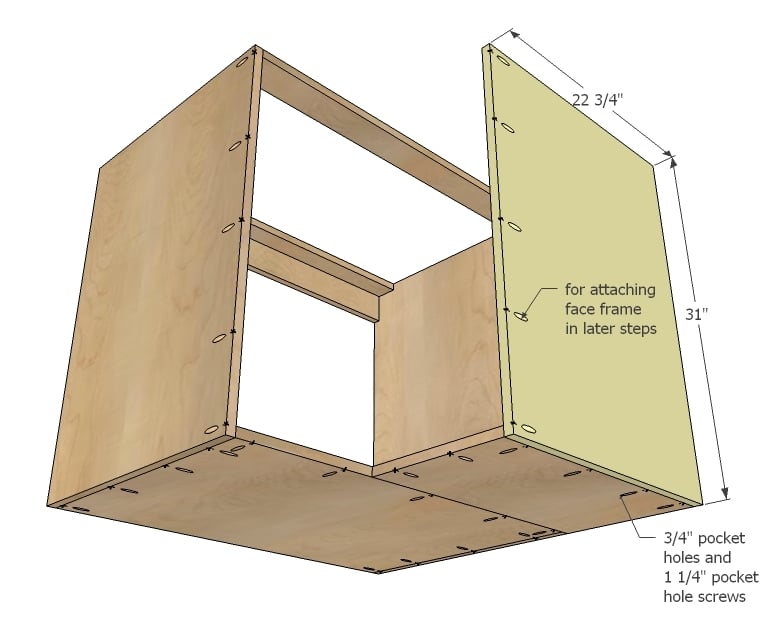
Now attach the side.
Step 5
Step 6
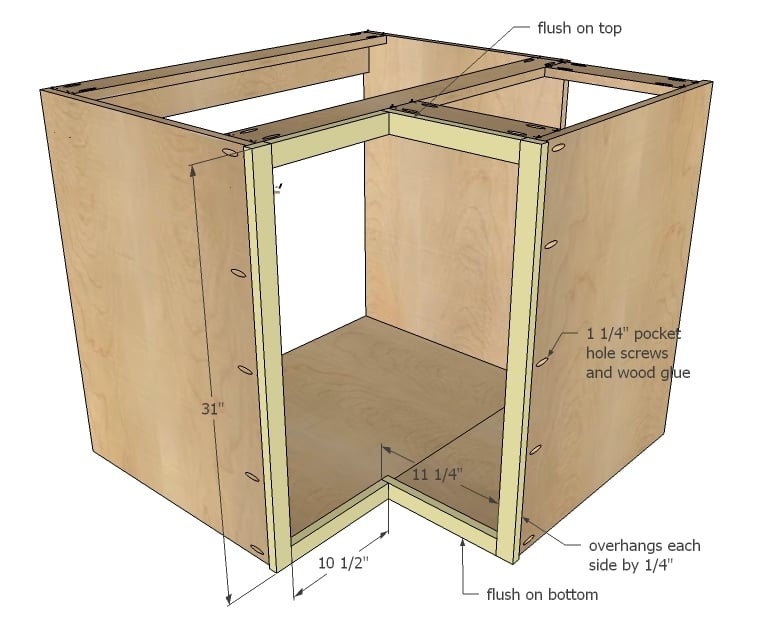
Build the face frame first, and then attach. Remember the sides overhang by 1/4" to give you some "wiggle" room when installing the cabinets.
Step 7
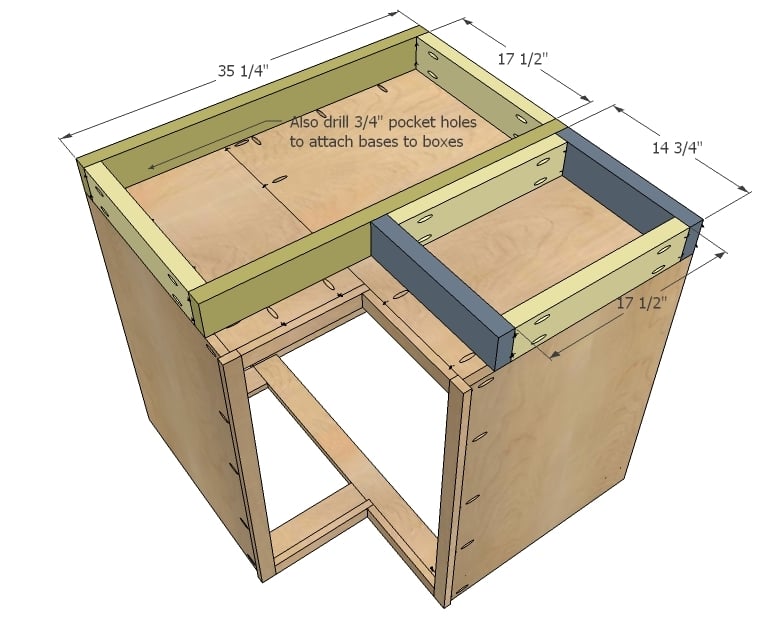
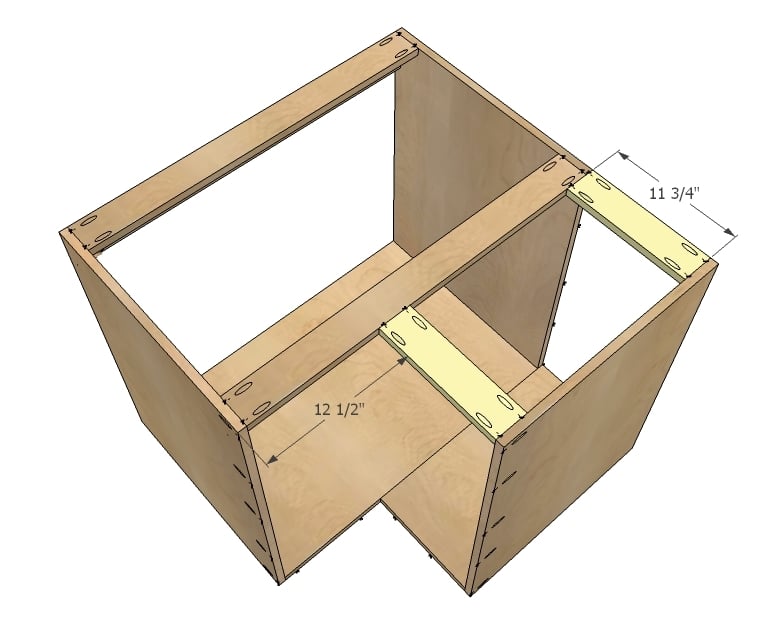
Build bases seperately also, drilling holes for attaching to bottom of cabinet. Attach in place.
Step 8
Plywood the backs, attaching with glue and 1 1/4" finish nails and 3/4" finish nails when you nail into 3/4" thick boards.
Step 9
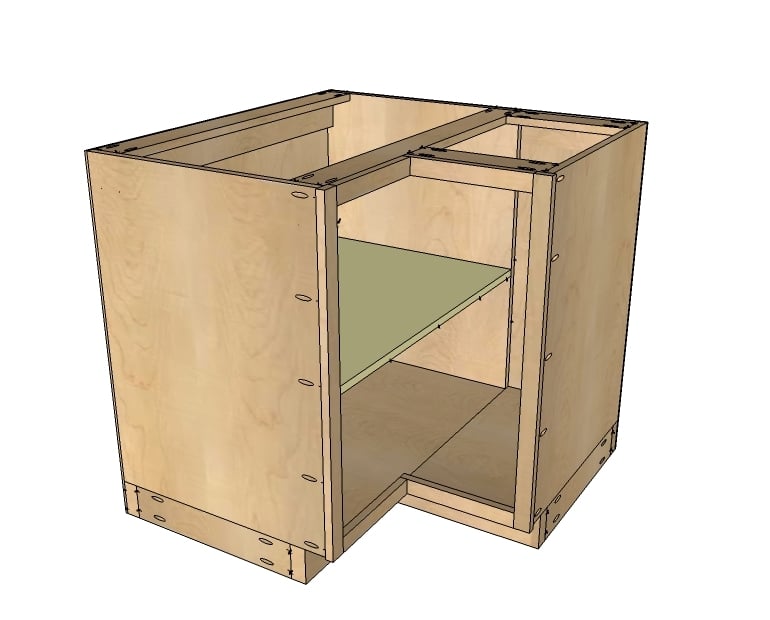
There's different ways you can do shelves, but I personally loved this way. Maybe because we always have a 50lb bag of rice to find a home for? I recommend fixing the shelf in place with screws rather than shelf pins just due to the size of it.
I saw IKEA cabinets that stagger straight shelves so they overlap only in the conres and thought that was a neat and simple solution as well. Gives you some tall, some short storage too.
Step 10
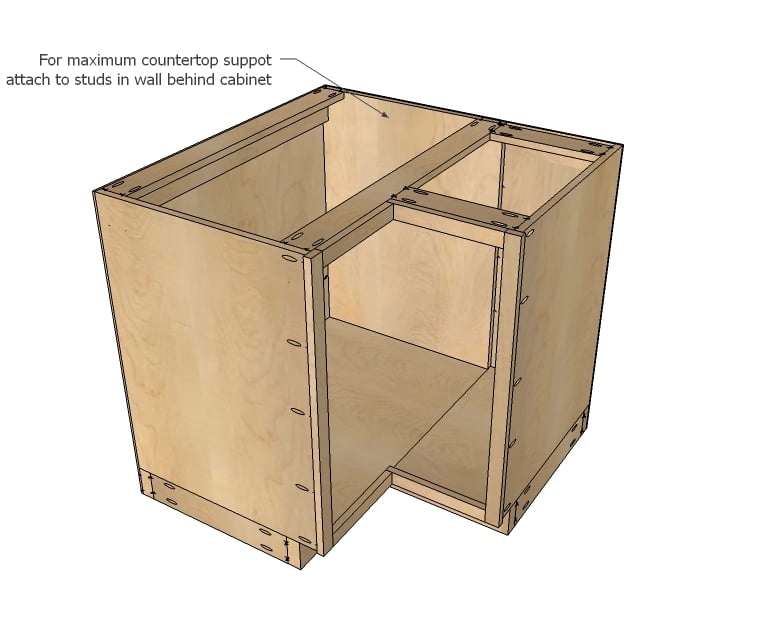
When you go to install the cabinets in your kitchen, I recommend attaching backs to walls to support heavier countertops.
Step 11
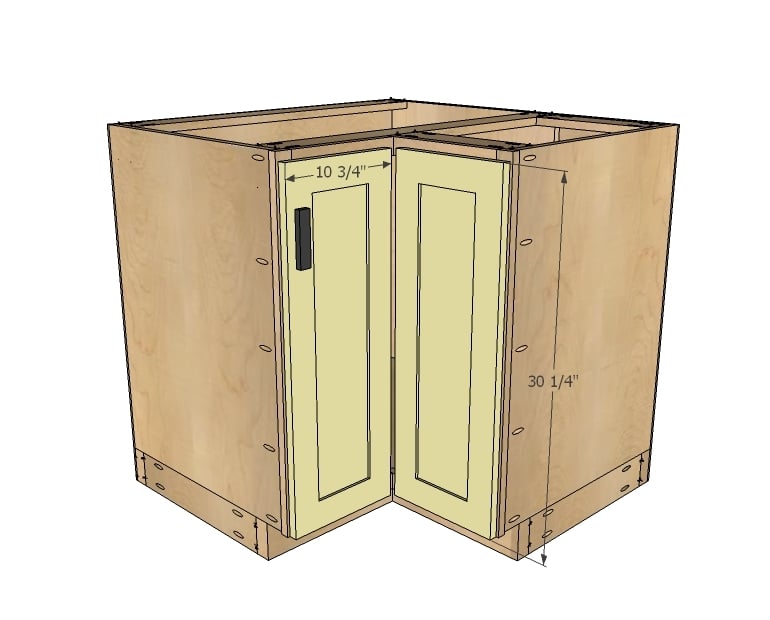
These doors are sized for full overlay face frame cabinets. The gap between cabinets is sized for narrow profile hinges, 3/4" x 3" - see next diagram
Step 12
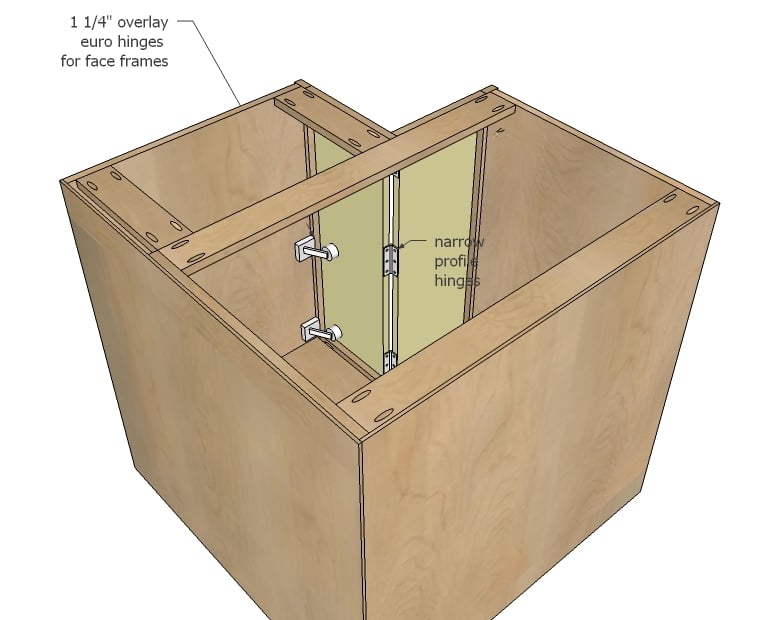
There are other hinges types, this is the most basic installation. If you choose a different hinge type, you may need to adjust your door widths for the best fit. My recommendation is to take any scrap 3/4" plywood - that is if you have any! - and cut door slabs and fit until you are happy before making doors.
Step 13
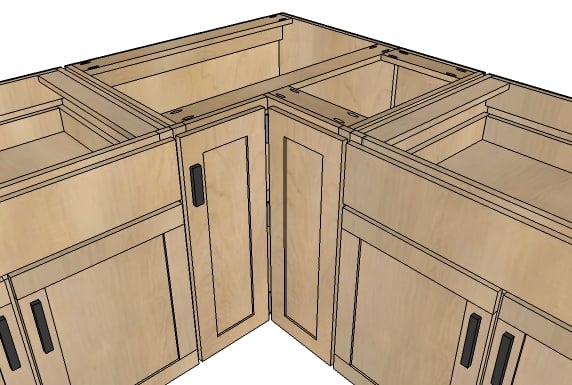
And this one is just to show how the cabinets line up with other models. Gaps between doors and drawers is in totally 1/2" everywhere.
Preparation Instructions
Fill all holes with wood filler and let dry. Apply additional coats of wood filler as needed. When wood filler is completely dry, sand the project in the direction of the wood grain with 120 grit sandpaper. Vacuum sanded project to remove sanding residue. Remove all sanding residue on work surfaces as well. Wipe project clean with damp cloth.
It is always recommended to apply a test coat on a hidden area or scrap piece to ensure color evenness and adhesion. Use primer or wood conditioner as needed.
Build Kitchen Cabinet Boxes for Corner Sink
Source: https://www.ana-white.com/woodworking-projects/36-corner-base-easy-reach-kitchen-cabinet-basic-model
0 Response to "Build Kitchen Cabinet Boxes for Corner Sink"
Post a Comment